With Some Practice, You Can Flare Lines with Flair
One of the most difficult little detail jobs in the mechanics of building a vehicle is creating custom length hard brake lines. For all but the most popular models, you eventually have to custom bend, cut, and flare hard metal lines to plumb the master cylinder to brake calipers. But with a bit of practice, and the right tools, it isn't that difficult to make professional, leak free flares.
For the sake of simplicity, and to eliminate points of failure, you should always try to plumb long straight runs of line with as few junctions and adapter fittings as possible. Of course, that is easier said than done. You can buy a 25-foot-long brake line, but often you can't easily run it unbroken from the rear axle junction block to the master cylinder.
There are basically three materials brake line tubing is made out of: steel, stainless steel, and cupronickel. Steel is the least expensive and typically available at your local auto parts store in lengths from about 10-inches to 5-feet, flaring and bending it is about medium difficulty, but it does rust. Stainless steel last forever and can often be found in pre-bent, pre-sized lines for popular cars, but it is more expensive and hard to bend and flare. Cupronickel is a nickel-copper alloy that is softer than steel, bends easy and doesn't rust, flaring it is easy and it is less expensive than stainless. If you are plumbing a whole car, cupronickel makes forming custom line easy, so that is what we used in our project.
Chances are no matter what length brake line you need, the standard lengths available from your local auto parts store are going to be just a little too long or short, and you are going to have to cut and flare a custom length yourself. Here's some information and advice, based on our years of installing brakes.
Types of Flare
There are two types of flair usually found on OEM brake lines and a third found in custom and racing vehicles. No thread sealing tape or paste is needed with flare fittings because the seal is between the flared line and a corresponding seat on the other side. No matter which type you are using, be careful not to overtighten them and ruin the seat in the caliper, master cylinder, or other connection (this is one reason why Wilwood uses banjo bolts or pipe thread for most connections, with easily replaceable adapter fittings).

Inverted Flare aka Double Flair - Technically, this is the S.A.E. (Society of Automotive Engineers) 45-degree double inverted flare. The end of the metal line is flared wider, then folded back in on itself to create a stronger flare for high-pressure applications, namely brake fluid. When done correctly, this concave flare is a perfect 45-degree angle and seals against a corresponding, convex seat.
Most classic American cars use hard brake lines with this type of flare. Fuel, power brake, and transmission fluid lines sometimes use single flare ends, because they operate under lower internal pressure, and are larger diameter, and therefore stronger lines.
Bubble Flare - Technically, this is the D.I.N./I.S.O. (Deutsche Institut für Normung/International Organization for Standardization) bubble flare. The end of the line is mushroomed out, and folded back, but not all the way, creating a rounded end. There is also a similar S.A.E. bubble flare that mostly differs where the fitting presses on it. Bubble flairs seat into a concave surface in the corresponding part it is being connected to.
You typically find bubble flares on European and some Asian and modern American cars and trucks.

AN Fittings - These were developed by the American military to standardize things between equipment and literally stand for Army Navy. These are the fittings on most braided stainless lines and feature a 37-degree flared end. They are seldom applied directly to hard lines, but the tools exist to do it. The issue is that the AN male threaded fittings typically have a convex flare so that the corresponding concave flare hard line would need a female threaded fitting.
AN fittings are found on military vehicles, of course, and all manner of high-performance machines. Typically adapters mate the AN fitting to an inverted or bubble flare line. You can also flare hard lines to the 37-degree angle to mate with AN, as long as you have the correct hard line fitting.
Flaring Tools
We will concentrate on the tools to make double flared lines since those are the most common. Most of these tools can also make other types of flares with a change of the die.

Wingnut Type - These are the least expensive, and you have probably seen them at your local auto parts store. Unfortunately, it is nearly impossible to make a good flare with the inexpensive (typically about $30) version you find many places. If you are only flaring 3/16" mild steel tubing, you should be able to do it with one of these with a bit of practice.
Do a little bit of research online, and you will see in customer reviews that some examples struggle to get three stars, while others consistently rate more than four. Quality control is sketchy on the generic versions, and often they don't hold the brake line tight enough for a proper flare. You really do get what you pay for in this instance, and the $100 you spend now will save you much frustration later.

On-Car Type - Not as common as the wingnut type, but working on the same principle is the on-car type of flaring tool. These are more compact than the others and were created for cutting and replacing lines while working under a car in limited space. They often cost less than the high-quality wingnut type, but only work on one diameter of brake line per tool.
You don't have to use these on the car, but they have a handle to give you enough leverage to use it without a bench vise. You can still use it with a vise if you prefer. Since most cars use the same size tubing everywhere, these tools are a bit of a bargain.

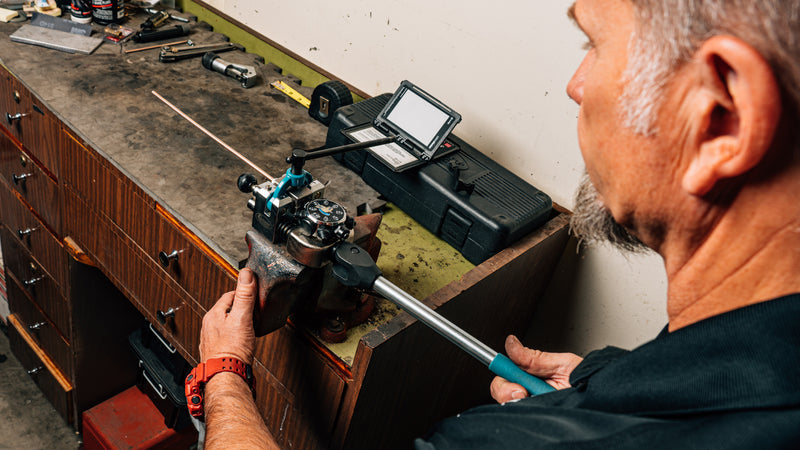
Lever Type - Much quicker than the two previous is the lever type of flaring tool, which instead of a screw has a long lever to provide enough force to make the flair. These often cost in the neighborhood of $200, and do require a bench vise. The advantage is that instead of tightening a screw, changing the die, then tightening the wingnut again, you pull the lever, release and rotate the tool to the next die, then pull it again. It even has a die to set the tube at the perfect length before flaring.
If you are going to be building more than one car in your lifetime, the savings in time (especially time spent trying again after a botched flare), plus the better quality of the flares are worth the extra money invested.

Hydraulic Type - The hydraulic brake line flaring tool is what the professionals use. It is a handheld version of similar machines used in factories where lines are made for production cars. This works similarly to the lever type, but incorporates a hydraulic piston and pump handle for more leverage in a compact package. These are great for flaring lines already installed on the car as well, and you don't need a bench vise.
The downside to the hydraulic type is they are often more than $300, but if you are the sort who is going to plumb an entire car, with fuel, transmission, brake, and other lines, this is the tool you want.
Tips For Making Perfect Flairs
It can be very frustrating when you come down to the final stage of a project and only have to plumb it to be done, but can't seem to get the brake lines right. Here are some tips to make your flares better, though it will still take practice and quality tools to make them perfect.

Straight Clean Cuts - in order to get a good double or bubble flare on a line, you have to start with a perfectly uniform, square end on the hard line. Never use a hacksaw. Use a tubing cutter with rollers and a round blade that clamps on and rotates until it cuts through. These tubing cutters are inexpensive, and you may find the cutting wheel becomes dull with time and needs to be replaced after a few projects, especially if you are making stainless lines.
Deburr the Line, Inside and Out - Most tubing cutters have a pointy blade for deburring the inside of the tube, but a dedicated deburring tool works better. Clean the outside of the tube as well with a wire brush, fine sandpaper, or Scotch-Brite so the sealing surface of the flare is smooth after you fold it back.
DON'T FORGET THE NUT! - At some point, everybody makes a perfectly formed flare, only to discover they have forgotten to slide the brake line fitting on the line before making it. Or, slide the nut too far and trapped it around a bend in the tube. Even worse than forgetting the fitting is putting it on backwards. Double-check your work before flaring.
Lubricate the End - In order to get good, smooth flares, it is important that the die slides on the tube easily. Many tools come with a little container of grease to dip the end in before you flair it. Otherwise, a little brake fluid can be used, or other oil, as long as you clean it well afterward.
Measure, Then Clamp - One of the reasons most flares are poorly formed is that there is too much, or not enough, of the line projecting from the clamp. The better tools have an "operation zero" die that sets the depth flush with the face of the die before you clamp the line tightly. On the more basic wingnut type tools, the proper depth can be determined by using the edge of the die; the amount sticking out should match the height of the die.
Routing - This is more important when bending than when flaring, but it is important to keep in mind when measuring. The reason all OEM systems have multiple, gradual bends in the line and loops up to the master cylinder is that the car can flex and move, and brake line needs slack so they don't pull and stress the fittings, or break, as the body and frame flex and move. Also, avoid routing the brake line close to the exhaust and avoid any pinch points or places it might rub against a sharp edge.
How To Flare
like anything that takes a little skill, you need practice before you get good and consistent at it. If you have never made brake line flares before, buy a spare piece of brake line at your local auto parts store and flare it a few times before you try to make the ones you need on your project.
1) Measure, Cut and Clean the Line - The old adage of measure twice, cut once applies here, but don't forget you lose a little length when you flare it.
1a) DON'T FORGET TO INSTALL THE NUT!
2) Position Hard Line in Clamp - If you are using the wingnut type flaring tool, position the tube so it projects from the clamp the proper amount, as measured against the edge of the die. In the other types of tool, the "operation zero" die will set the tube so that just enough is sticking out.
3) Operation One: The Flare - With the wingnut type tool, insert the nipple of the adapter into the end of the hard line and tighten the wingnut until it bottoms. With the handheld tool, tighten the OP 1 die until it bottoms. With the lever or hydraulic tools, pull the lever or pump the jack until the OP 1 die bottoms.
4) Operation Two: The Double Flare - With the wingnut tool, just change the adapter and tighten the wingnut down again and the pointed end will fold the line back in on itself while pressing the other end against the outside of the clamp. For the other tools, switch to the OP 2 die, and once again press it against the line like you did for OP 1.
5) Clean and Polish - If you did everything right, you should have nothing left to do except clean up. Make sure any grease and oil is cleaned off the end so it doesn't contaminate your brake fluid. Lapping tools exist to ensure the flare is perfectly shaped to seal properly, but if you formed it right, you shouldn't need anything more than a Scotch-Brite pad. Any cracks, or a misshapen, uneven flare, mean you have to cut it off and flare again, but if there are just small burrs you may be able to save it.


Robert,
If the brake line is 5"-6" away from the header, it should be fine made of either material. I did not know off the top of my head, but a quick search for heat conductivity of metals reveals copper-nickel to have a thermal conductivity of 29, while steel varies all over the place, from a low of 10 to about 60 (higher numbers means it conducts heat more).
More important is going to be keeping the lines as far away from the hot exhaust header as possible, which suggests using the softer metal that is easier to bend.
I purchased pre-bent steel lines for my build, but need to go custom from the MC to the block on the frame (early Bronco). This runs about 5-6" away from the headers. Would nicopp or steel be better in this application? I know steel is harder, more heat resistant, but it’s a tight area that will require a lot of bends. Is nicopp acceptable?
Great article , makes all process perfectly clear , recommendations are top notch and concise.
I am using wilwood products and wanted to hear from the horses mouth about flare types , frankly I wasn’t sure about my selection of tool to make the flares ( double) and discovered the tool I am employing is sited in the article ! Woooohooo ! Thank you Wilwood 😎
Great article, very informative and easily understood. Enjoy the upgraded web site ,lots of great info. Awesome company!!