When setting up a street car for performance driving or converting a classic to disc brakes, it is essential to include an adjustable proportioning valve in your brake system. This valve is typically plumbed into the rear brake line or built into the combination valve below the master cylinder. There is some confusion, though, about what these valves do, how they do it, and how to properly adjust them.

With a typical tandem master cylinder, the amount of brake line pressure delivered to each outlet will always be the same without a proportioning valve. However, since rear wheels don't have as much traction (in a stop), and rear brakes don't do as much, you need a way to adjust that pressure. Race cars with separate front and rear master cylinders use different bore sizes in the calipers and master cylinders so that the rear gets less pressure at all times, but even they sometimes employ a proportioning valve.

The name "proportioning valve" seems to confuse people. The valve is more of a pressure regulator, decreasing how much pressure goes through it by a set amount (once initial pressure reaches a certain point). Reducing the force going to one circuit doesn't increase the force going to the other brake circuit. However, when the valve reduces pressure to one circuit, the proportional relationship between the front and rear braking (front to rear brake bias) changes.

Adjusting the valve does not directly change how much pressure goes to the brakes it is plumbed into; it is not like a hose spigot. Adjusting the knob or lever changes the pressure level at which the valve is triggered; sometimes called the "knee point" because it is the point where, on a graph of brake pressure, the line bends. It may seem counterintuitive, but when the knob or lever is adjusted all the way out, the valve delivers the most substantial reduction to maximum pressure. Screw it in, or click the lever over the other way, and the proportioning valve will allow a greater amount of pressure to reach the rear brakes before proportioning is triggered.

Proportioning Valve Exploded  View

In Normal Driving

When you drive down the street in regular traffic, you seldom use the brakes hard enough to risk locking them up. In most everyday use, the proportioning valve doesn't do anything at all. In low-pressure brake applications, the rear brakes do a larger share of the braking because there is less brake dive from weight transfer to the front. As a result, there is little chance of the rear wheels locking up.

You save wear on the front brake pads by letting the rear brakes take more responsibility under light braking. In a hard stop, you want the front wheels to lock up slightly before the rear to prevent a spin.

A front-wheel brake bias has the same goal, no matter if it is baked into the size of the front and rear caliper pistons, limited with a proportioning valve, or set with a race car’s different sized master cylinders and balance bar. That goal is to reduce the amount of line pressure going to the rear brakes to prevent lock-up. Because braking causes most of the vehicle's weight to transfer to the front wheels, beyond a certain level of deceleration, the less traction the rear tires have and the less line pressure they can handle without locking up.

The proportioning valve lets you adjust the rear brake pressure to account for different tires, front to rear weight bias, and the effectiveness of rear disc or drum brakes.

Wilwood combination proportioning valve

How it Works

The inner workings of an adjustable proportioning valve are relatively simple but deceptively complex. Inside is a piston with less effective surface area at one end than the other, and a spring with a knob or lever controlling preload. The differential piston areas determine the fixed proportioning rate.

In everyday driving, the valve does nothing, with 100% of brake line pressure going through the valve as if it weren't there. Once the force on the larger area piston (the outlet line to the rear brakes) exceeds the preload force on the spring, the piston moves, cutting off the inlet from the outlet. Once the piston is unseated, the pressure from the master cylinder pushes on the smaller upper part of the piston, which moves the larger lower piston, transmitting pressure through the fluid to the rear brakes. Once closed, an increase in pressure from the master cylinder acting on the smaller area of the piston will open the valve again, allowing pressure to increase to the rear brake line. The pressure increase happens at a lesser proportion and then the increased line pressure again closes the valve.

The cycling of the valve happens very rapidly, too rapidly to be noticed by a driver, but our engineers have confirmed it in test rigs in the lab.

The different-sized ends of the pistons have a hydraulic disadvantage. Line pressure is in pounds per square inch, so, (without the preload spring in the system) 1000 psi pushing on the smaller side of the piston, connected to a piston with 57% greater surface area, results in just 430 psi in the chamber on the other side. In actual use, with the preload at different settings, you can see how much output you get for a specific input on the graph below.

If you graph the line pressure at the rear brakes compared to the master cylinder, the slope of the curve changes noticeably once it passes the point where the valve closes. This bend in the line on the graph is where the term "knee point" comes from. The full line pressure reaches the rear brakes until line pressure overcomes the preload on the proportioning valve spring. From that pressure up, it delivers only 43% of the additional force to the rear brakes.

It can be helpful to think about it this way: Once the proportioning valve is triggered closed, it is as if the master cylinder is controlling a slave cylinder, and the slave cylinder pushing another piston. That second piston then controls pressure to the rear brake circuit. All of this is contained in a valve that's the size of your thumb.

When adjusting the proportioning valve, you increase or decrease preload on that spring pressing on the piston. More spring preload (screwing the knob or clicking the lever inward) allows more line pressure before the valve closes and proportioning begins. Conversely, decreasing the spring preload triggers the valve to close at a lower pressure, moving the "knee point" down the graph. The lesser the spring preload, the lower pressure the valve is triggered at, the lower the ultimate amount of pressure delivered to the rear brakes.


Wilwood Brake Proportioning Valve Pressure Chart

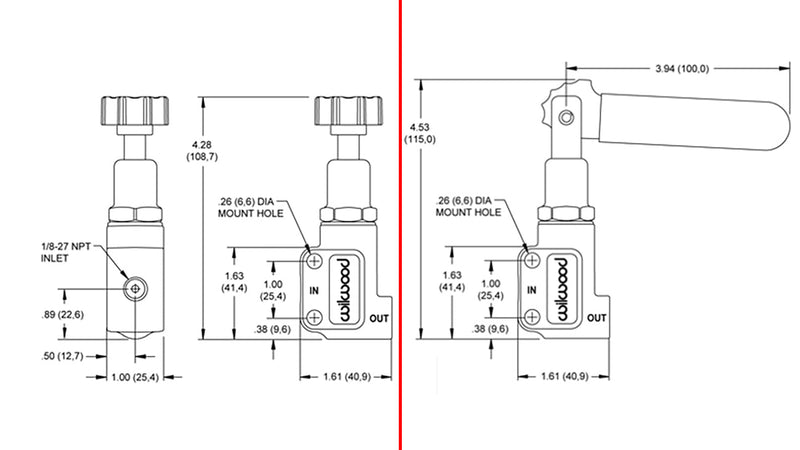
Wilwood Proportioning Valves

Wilwood makes three different styles of adjustable proportioning valve, including one designed to replace the factory combination valve and make plumbing easier. All three are based on the same internal design with the same strength spring. Wilwood's adjustable proportioning valve activation range goes from approximately 150 psi at minimum preload to 1200 psi at maximum.

The knob style valves allow infinitely variable adjustment, with approximately ten rotations from minimum to maximum. The lever style has six different settings, making it easy to adjust the brake bias quickly while racing, even in the middle of a lap. The six positions on the lever are approximately 150 psi, 360 psi, 570 psi, 780 psi, 990 psi, and 1200 psi.

The pressure delivered to the rear brakes is always directly proportional to the amount created at the master cylinder. Adjusting the valve adjusts the point at which that relationship changes, but it doesn't change the relationship. Below the trigger PSI needed to close the valve, it is a 1:1 relationship, and above that pressure, it is less than 1/2:1. The maximum pressure sent to the rear brakes is a function of the point at which the valve closes.

Set midway in the knob’s adjustment range, the valve is triggered at approximately 675 psi. From 1-675 psi, 100% of that pressure goes directly to the rear calipers. From 676 psi to the limit of your leg strength, just 43% gets through. If the master cylinder is putting out 1000 psi during a hard stop, the rear brake lines would have 675 psi, plus 43% of the additional 325 psi, for a total of 815 psi going to the rear calipers.


lever/knob position trigger PSI PSI at rear brake line PSI at rear brake line PSI at rear brake line PSI at rear brake line PSI at rear brake line
(with 300 psi from M/C) (with 600 psi from M/C) (with 900 psi from M/C) (with 1200 psi from M/C) (with 1500 psi from M/C)
notch 1/fully out 150 215 344 473 602 731
notch 2 360 300 463 592 721 850
notch 3 570 300 583 712 841 970
midway (knob only) 675 300 600 772 901 1030
notch 4 780 300 600 832 960 1090
notch 5 990 300 600 900 1080 1209
notch 6/fully in 1200 300 600 900 1200 1329

Why You Need One

Unless you track your car, a brake application that could lock up the rear brakes is a 1 in 100 or even 1 in 1000 occurrence. But when do you have to slam on your brakes? The last thing you want is the car's rear to step out and come around on you.

The vehicles that most need a proportioning valve have discs in the front and drums in the rear, which describes most disc brake conversions. When converting a drum brake car to front discs, or upgrading factory discs to Wilwood performance brakes, you dramatically change the brake bias compared to a four-wheel drum car or factory disc/drum car.

Install four-wheel discs on a formerly rear drum brake car (with the factory master cylinder and combination valve), and you may not get much rear braking at all. This is because drum brakes lock up at a much lower pressure than discs (the non-adjustable valves often kick in at less than 400 psi). The factory, non-adjustable proportioning valves only work in the narrow confines of the system, cars, and tires they were designed for. (There may also be a residual pressure valve involved that should be removed as well.)

In most drum brake setups, the spinning drum increases the force with which the shoes press into the brake lining; they are self-energizing. Early disc/drum cars needed proportioning valves that kicked in at low line pressure because brake dive and tire traction were much worse than now. The lower line pressures needed for drum brakes, and the sudden weight transfer when you step on the pedal, make it nearly impossible to keep them from locking up without a proportioning valve limiting the pressure.

Cars with drum brakes on all four wheels don't always require a proportioning valve on the rear line. Some big heavy vehicles in the 1960s with a lot of weight over the rear wheels didn't even have factory-installed proportioning valves. At the opposite extreme, some trucks still have mechanical proportioning valves that dramatically vary the pressure to the rear wheels based on the load in the bed.

Modern computer stability control and antilock braking systems adjust brake bias for you dynamically and can even apply the brakes of just one wheel at a time. The adjustable balance bar bias system in race cars can be set up nearly perfectly because, in a race car, most brake applications are made with maximum effort. An adjustable proportioning valve works well for most street applications, and once set up, doesn't require fiddling with unless you change things; fitting different wheels and tires, for instance.

1969 Camaro locks up all four wheels

Proper Initial Adjustment

For safety, start with the proportioning valve set with maximum reduction setting, knob fully screwed out, and work from there. Next, find an assistant to observe and an empty parking lot with no chance of hitting anything. You'll need to repeatedly stop from 30 mph with the wheels locked up without attracting too much attention.

  • Make sure your tires are correctly inflated to the recommended pressures.
  • For best results, you'll want half a tank of gas or less, no passengers, and minimal junk in your trunk.
  • Accelerate to 30 mph, then stop hard enough to lock up the wheels.
  • Have your assistant watch (from a safe distance) and confirm that the front and rear wheels lock.
  • If only the front locked, adjust the knob in two full turns to allow more pressure to the rear brakes and test again.
  • Continue adjusting in, two turns at a time, until the front and rear wheels lock in a hard stop.
  • Adjust knob out one complete turn and test again.
  • Continue these adjustments 1/2 turn in or out at a time until maximum braking can be achieved and no wheel rear lock is observed.
  • Test the vehicle again at 50 mph to judge the effects of a more dramatic weight transfer and make any additional adjustments as needed. Typically by turning the knob out to decrease pressure to the rear.

When bleeding your brakes, it can be helpful to turn the proportioning valve all the way in to make bleeding easier. Make a note of how many rotations it takes to fully in, then adjust back out the same amount when finished with bleeding.

21 comments

  • Bryan at Wilwood: October 31, 2023
    Author image

    Chris,

    The switch on a factory combination valve is for a dash warning light that tells you if the front or rear brake system has failed. Our switch is to activate the brake lights at the back of the car.

    As far as I know, nobody makes an adjustable version of a factory valve that retains that warning light function.

    Bryan

  • Chris Mashburn: October 17, 2023
    Author image

    For the instructions on your proportioning, It says you can use the switch on the valve to operate the brake lights instead of using the switch on the brake petal or vice versa. I was under the impression that the switch on the valve was for the brake warning light on the dash. Any help would be appreciated. Thanks

  • Bryan at Wilwood: April 28, 2023
    Author image

    Larry,

    Chances are it is not the proportioning valve is causing the issue – no matter where it is set it should be “transparent” in the system while bleeding because you are not building much pressure. I have forwarded this to our tech department because they answer questions and trouble shoot issues like this all day long. You can call them at 805-388-1188, Monday-Friday, 6am to 5pm Pacific Time and they will be happy to help you.

    When this issue comes up, the first thing I suggest is to check if the master cylinder piston is returning fully to its resting position against the snap ring. The piston inside a tandem master cylinder has a front and a rear piston seal, and there is a spring between them. It is very possible that the rear piston seal does not return all the way to rest, but the front does, because of that spring. If they do not return to rest, the seal doesn’t uncover the compensating port in the reservoir which allows more fluid into the bore to be pumped out the lines. It could be something as simple as an adjustable pedal stop or brake light switch not allowing the pedal arm to move back fully. It is explained in further detail here (with illustrations) – https://shop.wilwood.com/blogs/news/troubleshooting-no-fluid-pressure-at-the-rear-brakes

    Also, remember the rear calipers are quite a ways away, and if the lines are new and empty and the calipers are empty, it might take a lot of pumping before any fluid comes out at the caliper. Loosen the line to the rear from the prop valve and see if fluid comes out there. If there is no fluid even to the prop valve, you can check at the line going into it.

  • Larry Burns: April 26, 2023
    Author image

    In doing an initial bleed on a completely new wilwood brake system, we cannot get any fluid to the rear calipers. Even after draining, removing the master cylinder, and reinstalling. We tried bleeding with the proportioning valve completely closed. We get fluid to the front. Open the valve to try and bleed the rear and get no fluid at all. Any suggestions as to why we are not getting fluid? Bad proportioning valve? Thanks for any help.

  • Bryan at Wilwood: March 28, 2023
    Author image

    Mike,

    Yes, you should remove the factory combination valve if you are changing the rear brakes. There are several reasons for this:

    1) There is likely a drum brake 10lb residual valve built into it, if it isn’t in the master cylinder, which will make the rear discs drag.
    2) Drum brakes are usually designed to lock up at lower line pressure than disc brakes – This is by nature of the motion of the drum pressing the show into it as it spins. That means the factory proportioning is probably set to a lower pressure than is ideal.
    3) Once you change more than the basics of a vehicle, the factory settings are likely no longer correct. The adjustable valve will allow you to tune for more traction and stiffer springs/shocks and make the most of your braking
    4) The biggest component of the rear discs that will effect things is the piston size in the calipers – They should be significantly smaller than the pistons in the front calipers, even if the pads/rotors are similarly sized. The adjustable valve should allow you to adjust the bias if it is off (though it can’t correct for front calipers on the rear, which does happen)

  • Mike: March 27, 2023
    Author image

    Just to confirm, does Wilwood recommend removing the factory combination valve if an adjustable proportioning valve is installed? In my case I have over size rear disc brakes due to an axle swap on a 4×4. I had planned on running a combination valve that was setup for Disc/Disc and adding the proportioning valve after the combination valve for fine tuning. The factory setup was disc/drum.

    Thank You

    Helpful article by the way!

  • Bryan at Wilwood: January 31, 2023
    Author image

    Angelo,

    Yes, when you install the Wilwood adjustable proportioning valve you should remove the factory valve. Typically it is mounted right by the factory master cylinder and brake booster, so taking those off eliminates the factory valve.

    Some older trucks may have a load sensing prop valve back by the rear axle which allows more rear braking when there is a load in the truck. That makes it more complicated, and whether to remove that will depend on the truck and how you are using it.

  • angelo tomiselli: January 30, 2023
    Author image

    I remove the power brake and install a wellwood master cylinder manual proportioning valve.I have 4wheel disc brakes do I need to remove the proportioning valve that was on the car to install the wellwood master and adjusting proportioning valve. thanks

  • Bryan at Wilwood: December 08, 2022
    Author image

    Humberto,

    In order to bench bleed the master cylinder properly, DO NOT attach the adjustable proportioning valve.
    Mount the MC alone in a bench vice, attach the plastic bleeder kit to the outlet ports of the MC, and stroke the MC until all air is pushed out.
    Then install the MC in the vehicle and connect up the proportioning valve and lines.
    Lastly, bleed the entire system starting with the bottom bleed screw of the caliper furthest from the MC.

    Based on what you have told us, there is no reason to think there’s something wrong with the valve. We test every one before it leaves our facility. Follow the steps outlined above and you should have no problem with the braking system.

  • Humberto : November 29, 2022
    Author image

    Im trying to bench bleed my tandem master cylinder along with the knob proportional combination valve but It wont flow any fluid out of the rear out outlet, I`m sure I have flow out of the rear out port on the master cylinder, but nothing out of the rear out port in the combination valve. Could you help me out?

  • Joe Osgood: August 11, 2022
    Author image

    I just installed a proportion valve in the rear brakes of a Mustang that I change the front to disc brakes. Brake fluid will not go through the valve. If I bleed the at the (in) side I get fluid. If I try to bleed the line at the (out) side on the valve I get no fluid. Any suggestions?

  • Bryan at Wilwood: June 23, 2022
    Author image

    Bruce,

    If you want less pressure to reach the rear brakes, screw the knob all the way OUT. There is a spring inside, and the knob controls the preload. If you crank it in and put more preload on it, it won’t be activated until the line pressure is higher. There is no danger of driving with the knob backed all the way out, but you will find the rear brakes do very little. Be sure to adjust it again at your earliest convenience to restore your full braking ability.

    Bryan

  • BRUCE: June 23, 2022
    Author image

    I will be bedding a new set of Wilwood front pads on 6/23 (Tomorrow) and do not want to over heat or abuse the rear linings. Where should i adjust the rear brake line proportion valve knob, all in or all out ??

    THANKS

  • Vince : June 16, 2022
    Author image

    I had an issue on my 65 falcon with very hot rear disks brakes after I went for a drive.
    I decided to put one of these proportioning valves on and cannot believe the difference it made! Not only in reducing the rear caliper/disk heat but also, it made the fronts work better, and subsequently, made the car stop so much nicer and made it more responsive. Excellent investment cheers Wilwood.

  • Bryan at Wilwood: May 09, 2022
    Author image

    Yuri,

    This is impossible to diagnose with just this information. Please call our tech line and they will have more questions about the specific set up on your car.

    You can reach them during normal business hours on weekdays, 6am to 5pm Pacific Time at 1-805-388-1188

  • Bryan at Wilwood: May 09, 2022
    Author image

    Simon,

    The way these valves work is counterintuitive. When the spring is pressing the piston downward, that is the fully open position and the brake system sees the same pressure to the rear as the front (with a tandem master cylinder). When the pressure to the rear brakes reaches a certain (adjustable) point, it forces the piston up against the spring. When the piston is in the lowest position, fluid and pressure flow past the “seal” on the piston. When the piston moves up, the “seal” is sealed, and the proportioning is happening. Because the bottom of the piston has more surface area than the top side (because of the central shaft), the pressure on the bottom is going to have greater force for the same pounds per square inch (because it has more square inches, or closer to one square inch).

    If you are having a problem with the rear brake caliper remaining applied after you take your foot off the brakes, chances are the problem is in the master cylinder or the rubber line connecting to the hard line on the differential (if it is a solid rear axle car). If it is just one wheel, it is likely a caliper or (on an independent rear car) the flex line to that wheel. The first thing I would check is that the pushrod into the master cylinder (from the booster or directly from the pedal) is adjusted properly so that the master cylinder piston returns fully to rest and uncovers the compensating port.

  • Yuri Kuhnen : May 09, 2022
    Author image

    I installed a wilwood lever prop valve and for my surprise at max decrease (notch 1/ fully out) and at max pressure (notch 6/ fully in) settings, i had same readings on front and rear calipers pressure gauge that i installed. Both readings (front and rear calipers pressure gauge) come up together from zero to 1400 psi. Even slamming on breaks for sudden pressure there is no decrease on rear caliper pressure.
    I do not understand, it’s like i have a valve fully open all the time. Need some orientations, thank you.
    Yuri

  • Simon Neve: May 09, 2022
    Author image

    Hey

    I understand the general concept of the proportioning valve however we are haveing an issue where after the brake pedal is released with the leaver in the most “more brake” position the rear tires stays blocked as if the proportioning valve is not letting the brake pressue return to the master

    If we put it in the least brake position this still occours however much less so

    I have been takeing the valve apart afterwards to gain understanding of the valve in order to figure out what the potential problem could be

    When i look at it however it looks like the IN of the fluid is pushing the piston down ( same direction as the spring is pressing the piston and that meaning closeing off the valve bottom

    As far as i can make sense of it by the looks of the piston it is functioning exactly backwards compared to the explaination given and the IN and OUT of the valve
    This is ofc just me being unable to see the logic however i dont know if there is a way to explain not the general concept of a proprotioning valve but give a more detailed explaination of excatly what happens and in what direction the parts are moveing in your valves specificly

    By my logic the piston down would be the closed position ( held down but the spring )

    However for the valve to make sense the down position would have to be the open position, however i dont see what exactly get closed and how inside the valve in the up position

  • Bryan from Wilwood: May 03, 2022
    Author image

    Rob,
    Thanks for the comment.

    If you are still using the master cylinder mounted under the floor board, then yes, you do need a 2 pound residual pressure valve in that line to keep fluid from draining back from the front brake calipers. That should improve the mushiness of the pedal and reduce travel before the pads start to grab the rotor.

  • Rob Lapsley: May 03, 2022
    Author image

    Further to my comment: Should I have a 2# RPV in the line to the front disks? I put a 10# in the line to the rear drums.
    Rob

Leave a comment

All blog comments are checked prior to publishing